I am finding with these 3d objects that they take a lot more time than I think they will.
First one was a total disaster trying to figure out the scoring and folding.
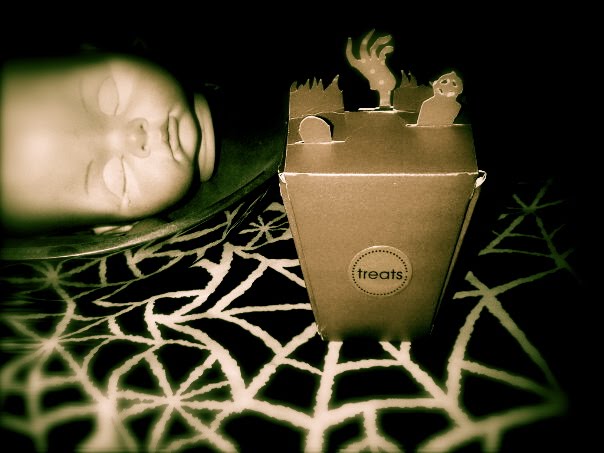
Here is the second one I attempted with some pictures to hopefully aid you.
Think of folding the box in:


I did fit to page on this and the size it cut was 11.5 inches.
Completed Size is about 4.5 inches.
The biggest issue that I am having is in the design of these objects is that they seem to go together with the weakest parts of the paper. Does that make sense? Well for example, on this box, the hand is supposed to slide into the slot on the top of the box. Seems simple enough until you try and put the fragile fingers through. Maybe I just don't have the light touch necessary or I am using the wrong kind of paper. I used Die Cuts With a View : shimmer stack which was pretty thick in my opinion and even lined the inside of the box. The hand still crumpled up and wasn't as neat. (Does anyone have any suggestions for thicker/stronger cardstock that doesn't have layers separate??!)
I just said forget it and cut the slot off. I needed to cut the top of it a bit anyway because I wanted it to hold a Bath and Body Works "candy corn" scented PocketBac. It just barely fit!

Supplies:
Cardstock: Die Cuts With a View: Shimmer Stack
Paper: Orange Polka- Dot. Sorry I forget brand but I am sure any fun paper will do :)
Zig Two Way Glue Pen
Therm O Web Super Tape
Sticker: G Studio Halloween Bubbles. Check in Joann Fabrics Dollar Scrap Section.
Tips and Tricks:
You will need to score this in many places.
Highly recommend Therm O Web Double Sided Super Tape
Thanks for looking.
Mike.


creeeeeepy, great job. Looks great, thanks for sharing. BTW, the pic is pretty cool with the doll's head and all =D
ReplyDeleteThanks! :)
ReplyDelete